The finish is the final, crucial step in any woodworking project that not only protects the wood but also defines its character and appearance. Understanding the different types of wood finishes and their specific applications can be overwhelming for woodworkers, especially beginners. This guide aims to demystify the main options available, explaining their unique properties, benefits, and drawbacks. The finish you choose depends entirely on your project’s intended use and desired aesthetic. From the color-enhancing qualities of stains to the protective durability of polyurethane and the natural feel of oil finishes, each option serves different purposes and creates distinct visual outcomes. The finish is what separates a raw piece of wood from a beautiful, long-lasting piece of furniture, making it an investment that’s worth understanding thoroughly.
Option 1: Wood Stain (For Color)
Wood stain is a coloring agent that penetrates the wood grain to change its color while still allowing the grain pattern to show through. It’s essentially a pigment suspended in a liquid carrier that soaks into the wood fibers, providing coloration rather than forming a protective film on the surface.
What It Is:
Wood stain is a combination of pigments and solvents that penetrate into the wood fibers. The pigments are larger particles that sit in the wood grain, allowing the natural texture to remain visible while changing the color. Unlike dyes, which penetrate more deeply and evenly, stains sit more on the surface, highlighting grain variations.
Pros of Using Stain:
- Immense variety of color options available
- Enhances the natural grain pattern of the wood
- Allows the wood’s texture to remain visible
- Relatively easy to apply
- Can correct color variations in wood
Cons of Using Stain:
- Offers no real protection on its own (requires topcoat)
- Can create uneven coloration on certain woods
- Difficult to remove if applied incorrectly
- Requires careful application to avoid blotching
Application Tip: Always test your stain on a scrap piece of the same wood first. Different woods absorb stain differently, and what looks perfect on pine may look completely different on oak or maple.
Types of Stains:
Oil-Based Stains: Penetrate deeply into the wood and are easier to work with, offering longer working time. They provide rich color and are forgiving of application errors.
Water-Based Stains: Dry faster, emit fewer fumes, and raise the grain less than oil-based stains. They may require more coats to achieve the same depth of color.
Gel Stains: Thicker consistency that’s easier to control and less likely to drip. Good for vertical surfaces or when you want more control over the application.
Option 2: Polyurethane (For Durability)
Polyurethane is a liquid plastic that forms a hard, protective film on top of the wood, offering superior protection against scratches, water, and wear. It’s one of the most popular finishes for high-use items like tables, floors, and frequently touched surfaces.
What It Is:
Polyurethane is a synthetic resin that creates a tough, protective coating when it cures. It forms a physical barrier between the wood and the environment, providing excellent resistance to moisture, heat, scratches, and chemicals. It’s available in both oil-modified and water-based formulations.
Pros of Using Polyurethane:
- Excellent protection against scratches and water
- Very durable and long-lasting
- Good chemical resistance
- Available in various sheens (matte, satin, gloss)
- Relatively easy to repair with touch-ups
Cons of Using Polyurethane:
- Can sometimes look and feel like plastic
- Requires good ventilation during application
- Longer drying time between coats
- Difficult to achieve perfect results for beginners
- Can yellow over time (especially oil-based)
Types of Polyurethane:
Oil-Modified Polyurethane: Provides deeper penetration, is more forgiving to apply, and gives a warmer look. It takes longer to dry and cure but provides excellent durability.
Water-Based Polyurethane: Dries faster, emits fewer fumes, and doesn’t yellow as much over time. It’s easier to clean up but requires more careful application to achieve a smooth finish.
Application Consideration: For best results with polyurethane, apply thin, even coats with quality brushes. Sand lightly between coats with fine-grit sandpaper for a smooth, professional appearance.
Option 3: Penetrating Oil Finishes (For a Natural Feel)
Penetrating oil finishes, such as Tung oil or Danish oil, soak into the wood and harden from within, providing protection while maintaining the natural look and feel of the wood. These finishes are ideal when you want to preserve the wood’s natural texture and appearance.
What It Is:
Penetrating oil finishes are natural or synthetic oils that penetrate deep into the wood fibers and then cure or harden, providing protection from within. Unlike film-forming finishes like polyurethane, oils become part of the wood itself rather than sitting on top of it.
Pros of Using Oil Finishes:
- Beautiful, natural look and feel
- Easy to repair by adding more oil as needed
- Enhances the wood’s depth and color naturally
- Less likely to show scratches and wear
- Environmentally friendlier options available
Cons of Using Oil Finishes:
- Less durable than polyurethane finishes
- Requires more frequent maintenance
- Longer initial application process
- More susceptible to water and heat damage
- May require multiple applications over several days
Common Oil Finishes:
Tung Oil: A natural oil that provides good water resistance and a beautiful, deep finish. It’s food-safe when cured, making it ideal for cutting boards and food preparation surfaces.
Danish Oil: A blend of oil and varnish that provides better durability than pure oils while maintaining a natural appearance. It’s easier to apply than pure oils.
Teak Oil: Specifically formulated for dense hardwoods but suitable for other woods as well. It provides good protection and enhances the wood’s natural beauty.
Maintenance Tip: Oil finishes can be easily maintained by applying a thin coat when the wood begins to look dry. Simply clean the surface and apply a new coat following the manufacturer’s instructions.
Which to Choose?: A Decision Tree
Deciding on the right finish depends on the specific requirements of your project. A simple decision tree can help you choose the best option based on intended use and desired appearance.
For High-Traffic Surfaces (Tables, Floors, etc.):
Choose polyurethane for maximum durability. For a dining table that will see daily use, cutting boards, or floors, polyurethane provides the best protection against scratches, water, and wear. Oil-modified polyurethane offers a beautiful finish with excellent durability.
For Moderate-Use Items (Bookshelves, Picture Frames, Decorative Items):
Either stain followed by polyurethane or oil finishes can work well, depending on your aesthetic preference. For a more traditional look, oil finishes are excellent. For more protection, use stain with a polyurethane topcoat.
For Food-Safe Applications (Cutting Boards, Butcher Block, etc.):
Use food-safe oils like mineral oil or tung oil, or specialized food-safe finishes. Avoid polyurethane on surfaces that will come into direct contact with food.
For Decorative Items (Artistic Projects, Sculptures):
Oil finishes often work best as they don’t add a plastic-like appearance that can detract from artistic details. They also allow the true character of the wood to shine through.
Environmental Consideration: Always apply finishes in a well-ventilated area and follow manufacturer safety instructions. Some finishes emit fumes that can be harmful if inhaled in poorly ventilated spaces.
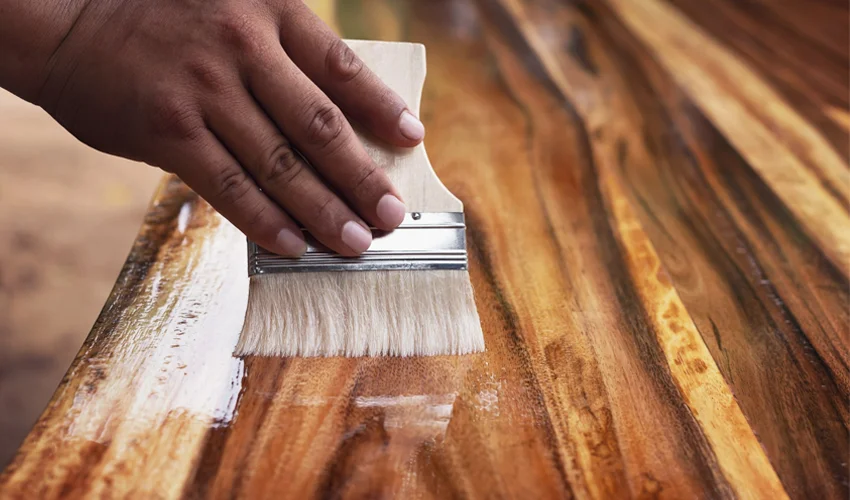
Application Techniques and Best Practices
Proper application is just as important as choosing the right finish. Even the best finish will fail if not applied correctly.
Surface Preparation:
Regardless of which finish you choose, proper surface preparation is crucial. Sand the wood to an appropriate grit (usually 220 for most finishes), removing all dust with a tack cloth or vacuum before applying any finish.
Ensure the wood is dry and free of contaminants. If you’ve used wood conditioner before staining, allow it to penetrate properly before applying the stain.
Application Direction: Always apply finishes in the direction of the wood grain. This minimizes brush marks and creates a more uniform appearance.
Multiple Coats:
Most finishes require multiple coats for optimal results. Follow manufacturer instructions for drying times between coats. Lightly sand between coats with fine-grit sandpaper (320-400 grit) to remove any dust nibs and ensure good adhesion between coats.
Don’t apply coats too thickly – thin, even coats provide better results than thick applications.
Common Finishing Mistakes and How to Avoid Them
Even experienced woodworkers encounter finishing challenges. Understanding common mistakes helps prevent them in your projects.
Problem: Blotchy Stain Application
This occurs when wood absorbs stain unevenly, especially in soft woods like pine or cherry. Solution: Apply a wood conditioner before staining, or use a gel stain which applies more evenly.
Problem: Bubbles or Brush Marks in Finish
Caused by applying finish too thickly, stirring too vigorously, or not maintaining a wet edge. Solution: Apply thin, even coats and work in the direction of the grain without over-brushing.
Problem: Dust Accumulation
Occurs when dust settles on wet finish. Prevention: Clean your workspace thoroughly before finishing, and consider using a spray-on finish in very dusty conditions.
Problem: Uneven Sheen or Color
Often caused by inconsistent application or temperature variation. Solution: Maintain consistent application technique and work in stable temperature conditions.
Repair Consideration: Most finishing problems can be corrected by sanding back to bare wood and starting over. Don’t be afraid to do this if the finish isn’t turning out as expected.
Maintenance and Long-Term Care
Finishes require different levels of maintenance over time. Understanding these requirements helps you choose a finish you can maintain.
Polyurethane Maintenance:
High-quality polyurethane finishes can last for many years with minimal maintenance. Simply clean with appropriate cleaners and avoid harsh chemicals. When scratches or wear become visible, consider applying a maintenance coat.
Never use ammonia-based cleaners or harsh chemicals on polyurethane finishes, as these can break down the protective coating.
Oil Finish Maintenance:
Oil finishes require more frequent maintenance, typically once or twice per year depending on usage. Simply clean the surface and apply a thin coat of the same oil finish to maintain protection.
Over time, oil finishes can be built up gradually to create a more durable surface, unlike film finishes which require complete removal and reapplication.
Long-Term Strategy: Consider the long-term maintenance requirements when choosing your finish. A more durable finish might require less frequent maintenance, but oil finishes offer easier repair options.
Conclusion
Choosing the right wood finish depends entirely on the intended use of your project and the aesthetic you desire. Each type of finish – stain for color, polyurethane for durability, and oil for natural appearance – has its place in woodworking projects.
Remember that the finish is the final step that determines how your project will look and perform for years to come. Take time to understand the requirements of your specific project before making a decision.
For maximum durability, consider combining finishes – for example, using stain to add color and polyurethane for protection. For natural beauty and feel, oil finishes provide unmatched results.
Always test your finishing approach on a scrap piece of the same wood before committing to your actual project. This prevents costly mistakes and helps you achieve professional-looking results.
With the knowledge of these different finishing options, you’re now equipped to make informed decisions that will enhance both the appearance and longevity of your woodworking projects.