Are you ready to dive into the rewarding world of woodworking? This rustic wooden bookshelf project is perfectly designed for first-time woodworkers, offering a simple yet satisfying build that can be completed in a single afternoon. Not only will you have a beautiful, custom-built piece of furniture for your home, but you’ll also gain confidence and fundamental skills that will serve you well in future projects. The beauty of this project lies in its simplicity – requiring only basic tools and straightforward construction techniques. By following this comprehensive guide, you’ll create a sturdy, attractive bookshelf that showcases the natural beauty of wood while serving a practical function in your space. This project positions itself as the perfect first step for anyone wanting to get into woodworking, promising a simple, rewarding build with minimal tools and maximum satisfaction.
Gather Your Supplies
Before beginning any woodworking project, proper preparation is essential. Gathering all necessary materials and tools beforehand ensures a smooth, efficient build process without interruptions. This step is particularly important for beginners who might not be familiar with tool locations or how long certain items take to find.
Wood Selection:
For this project, you’ll need:
- Two 1×10 boards, 6 feet long (for the sides of the bookshelf)
- Three 1×10 boards, 30 inches long (for the shelves)
- Optional: 1×2 strips for additional shelf support
Wood Type Recommendation: Pine is ideal for beginners due to its affordability, ease of working, and forgiving nature. However, cedar, poplar, or oak can be used for a different aesthetic or greater durability.
Pro Tip: Have your lumber cut to size at the hardware store if possible. This saves time and ensures accurate cuts, which is especially important for beginners who may not yet have confidence with a miter saw.
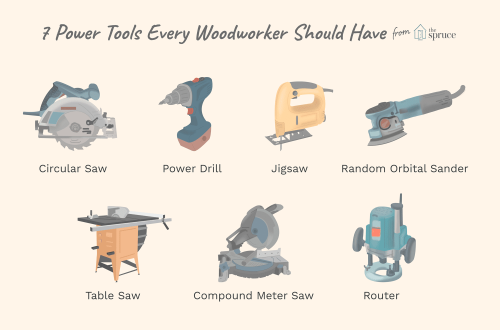
Tools & Hardware:
- Drill: Essential for pilot holes and driving screws
- Spade bits or Forstner bits: For creating counterbores if desired
- Screws: 2.5-inch wood screws for assembly
- Measuring tape: Essential for accurate measurements
- Pencil: For marking cuts and locations
- Level: Ensures your bookshelf stands straight
- Clamps: Optional but helpful for assembly
- Sandpaper: 120 and 220 grit for smoothing
- Safety gear: Safety glasses and work gloves
The Simple Cut List
Having a clear cut list is crucial for efficient project completion. For this rustic bookshelf, the cuts are straightforward, but accuracy is important to ensure the finished product is both functional and aesthetically pleasing.
Required Cuts:
- Side Panels: Two pieces at 72 inches (6 feet) in length
- Shelves: Three pieces at 30 inches in length
- Optional Support Cleats: Six pieces at 8 inches in length if needed
Alternative Size Options: This design is easily customizable. For a taller bookshelf, extend the side panels. For a wider version, increase the shelf length. Just maintain the same proportions and spacing between shelves.
Marking and Measuring:
Before making any cuts, clearly mark all measurements with a pencil. Use a square to ensure your marks are perpendicular to the board edges. Double-check all measurements before cutting – it’s better to take extra time to measure than to waste lumber on incorrect cuts.
If you’re cutting the wood yourself, use a miter saw for the cleanest, most accurate cuts. A circular saw with a guide can also work if properly set up.
Step-by-Step Assembly Guide
With all materials and tools gathered, it’s time to begin the assembly process. This section provides clear, numbered steps that will guide you through the construction of your bookshelf, with the goal of ensuring a successful outcome.
Step 1: Prepare the Wood
Begin by sanding all wood pieces with 120-grit sandpaper to remove any rough spots or splinters. Pay special attention to the areas where boards will be joined. After the initial sanding, finish with 220-grit sandpaper for a smooth, finished feel.
Wipe all pieces clean with a damp cloth to remove sawdust before proceeding to assembly. This ensures better adhesion if you’re using wood glue, and cleaner screw holes.
Assembly Tip: Lay out all pieces before beginning assembly to ensure you have everything and that all pieces match your cut list. This prevents confusion during the actual building process.
Step 2: Mark Shelf Locations on Side Boards
Decide on the spacing between your shelves. For a balanced look, consider spacing shelves 10-12 inches apart. Measure and mark the locations on both side panels simultaneously to ensure they match perfectly.
Use a level to ensure your shelf marks are perfectly horizontal. A small mistake in alignment will be magnified in the final product. Mark both the top and bottom of each shelf location for reference during assembly.
Step 3: Attach the Top and Bottom Shelves
Begin assembly by attaching the top and bottom shelves to create the main frame of the bookshelf. Position one side panel flat on your work surface.
Apply wood glue to the edge of the shelf where it will contact the side panel. Position the shelf at your marked location and clamp it in place if you have clamps available.
Pre-drill pilot holes through the side panel into the end of the shelf to prevent splitting. Use 2.5-inch wood screws and drive them in at an angle for maximum holding power. Repeat for the opposite side panel.
Step 4: Install the Remaining Shelves
With the main frame established, install the middle shelf. Follow the same process: apply glue, position the shelf, clamp if possible, pre-drill pilot holes, and secure with screws.
Ensure the shelf is level and square before driving the final screws. Check that the distance between all shelves is consistent.
Assembly Tips:
- Always pre-drill pilot holes to prevent wood from splitting
- Use wood glue in addition to screws for maximum strength
- Check for squareness during assembly using the 3-4-5 triangle method
- Don’t over-tighten screws, as this can strip the wood
Finishing Your Bookshelf
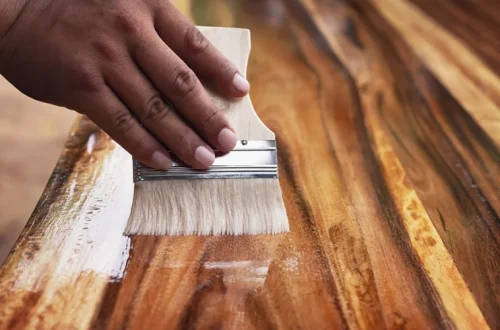
The finishing process is what transforms your raw wood project into a beautiful, long-lasting piece of furniture. The finish you choose depends on both aesthetic preferences and functional requirements.
Staining Options:
A wood stain allows the beautiful grain of the wood to show through while changing its color. Popular stains for rustic bookshelves include:
- Natural/Minwax Natural: Enhances the wood’s natural color
- Early American: Provides a warm, honey-like color
- Dark Walnut: Creates a rich, sophisticated look
- White Wash: Creates the popular whitewashed, farmhouse aesthetic
Staining Technique: Apply stain in the direction of the wood grain using a clean cloth or brush. Allow it to penetrate for the time specified on the product label, then wipe away excess. Test on a scrap piece first to ensure you achieve the desired color.
Sealing Options:
After staining (or if leaving the wood natural), apply a protective topcoat. For a bookshelf that will see regular use:
- Polyurethane: Provides excellent durability and protection
- Polycrylic: Offers good protection with less yellowing over time
- Tung Oil: Provides a natural look with good water resistance
Application Tip: Apply thin, even coats of finish, sanding lightly between coats with fine-grit sandpaper (220-320 grit). This creates a smooth, professional appearance.
Safety Considerations
Safety should always be the top priority when working with tools and materials. As a beginner, it’s especially important to follow safety protocols to prevent accidents and injuries.
Tool Safety:
Always wear safety glasses when cutting, drilling, or sanding. Wood chips and sawdust can cause serious eye injuries. Use hearing protection if operating loud power tools for extended periods.
Keep your workspace well-lit and organized. A cluttered workspace increases the risk of accidents and makes projects more difficult to complete.
Power Tool Safety: Unplug power tools when changing bits or making adjustments. Keep hands away from cutting edges and be aware of where your cutting line is taking you.
Chemical Safety:
When applying stains or finishes, ensure adequate ventilation. Many of these products contain volatile organic compounds (VOCs) that can be harmful if inhaled in poorly ventilated spaces.
Follow all manufacturer instructions for safe handling of chemical products. Keep them away from heat sources and store properly after use.
Troubleshooting Common Assembly Issues
Even with careful planning, issues can arise during the assembly process. Understanding common problems and their solutions will help ensure your project’s success.
Problem: Wood Splits During Screw Installation
Solution: Ensure you’re using pilot holes that are slightly smaller than the screw diameter. If splitting continues, try using longer pilot holes or switching to a different type of fastener. Pre-drilling and using wood glue can also help prevent splitting.
Problem: Bookshelf is Wobbly or Not Square
Solution: Check that all joints are properly secured and that the frame is square during assembly. Use the 3-4-5 triangle method to verify squareness (measure 3 units from the corner, 4 units on the adjacent side, and the diagonal should equal 5 units).
Prevention Tip: Check for squareness and level throughout the assembly process, not just at the end. Correct any issues before they become permanent.
Problem: Shelves Sag Under Weight
Solution: For longer shelves (over 30 inches), consider adding center support cleats or using thicker wood. Alternatively, add vertical dividers between sections to prevent sagging.
Customization and Variations
Once you’ve completed the basic bookshelf, consider modifications that make the piece uniquely yours. The modular design of this bookshelf allows for numerous customization options.
Size Modifications:
Adjust the height by making the side panels longer or shorter. For a narrower shelf, decrease the length of the shelves. For a wider unit, increase shelf length, but be mindful of span limitations that could lead to sagging.
Change shelf spacing to accommodate books of different heights or to create a more dynamic visual appearance. You might have space for tall books on bottom shelves and smaller items on upper shelves.
Design Enhancements:
- Back Panel: Add a thin plywood or hardboard back panel for additional support and a finished look
- Baskets or Bins: Install brackets to hold woven baskets for alternative storage
- Lighting: Add LED strip lighting under shelves for ambiance
- Adjustable Shelves: Install shelf pins for customizable spacing
Advanced Techniques:
As your skills improve, consider techniques like wood joinery instead of screws, adding decorative elements like corbels, or experimenting with different finishing techniques such as distressing or two-toning.
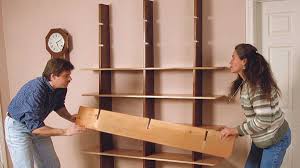
Conclusion
Congratulations! You’ve completed your first major woodworking project and should feel proud of your accomplishment. This rustic bookshelf project has provided you with the foundational skills needed for more complex projects in the future. From learning to measure accurately to understanding the importance of proper assembly techniques, you’ve gained valuable experience that will serve you well in your woodworking journey.
The skills you’ve developed – measuring, cutting, sanding, assembly, and finishing – form the core of most woodworking projects. Each project builds on these fundamentals while introducing new techniques and challenges.
This bookshelf serves not only as a functional piece of furniture but also as a confidence builder. The knowledge that you created something beautiful and functional with your own hands is incredibly rewarding and often becomes the catalyst for additional projects.
Remember, every expert woodworker started with a simple project like this one. The key to continued success is practice, patience, and a willingness to learn from both successes and mistakes. This bookshelf represents the beginning of what could become a lifelong passion for creating with wood.
Display your bookshelf proudly and use it as a launching point for your next project. The woodworking community is incredibly welcoming to newcomers, and there’s always something new to learn and try.