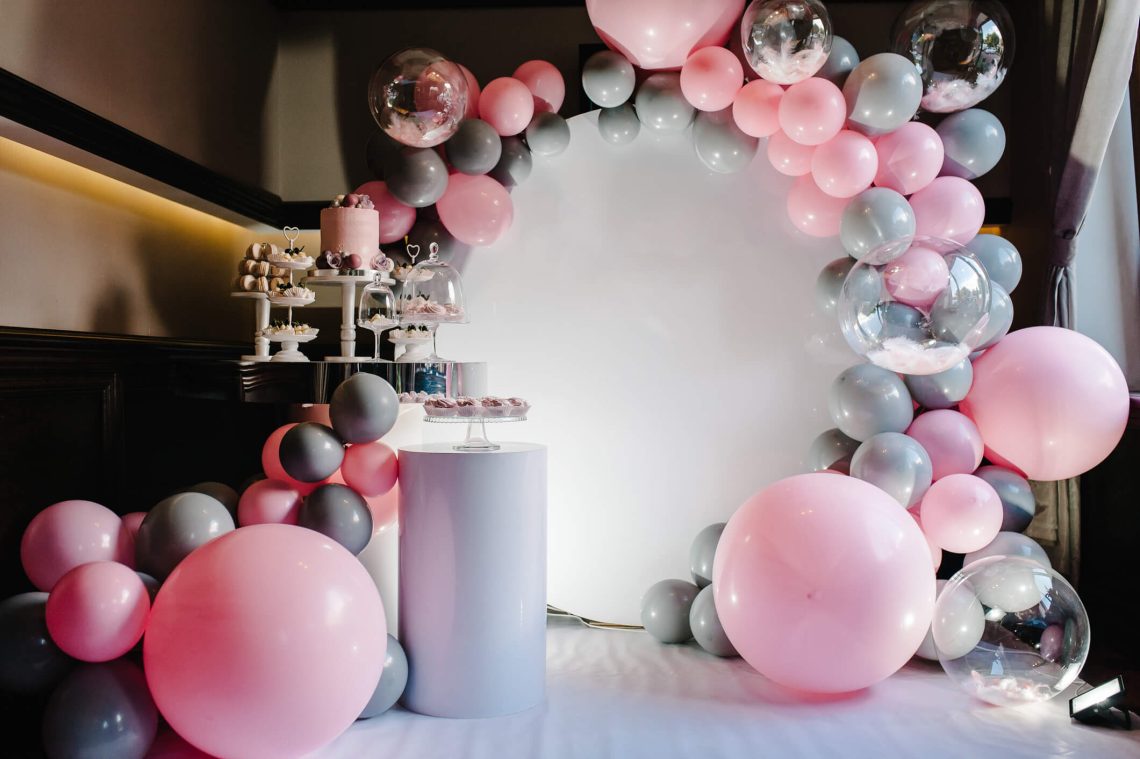
The balloon arch serves as the ultimate high-impact, low-cost piece of decor that creates a perfect photo-op for any celebration. This versatile decoration can be adapted for countless occasions – from birthday parties and baby showers to weddings and corporate events. The visual drama of a balloon arch combined with its relatively simple construction makes it an ideal DIY project that delivers professional-looking results. This comprehensive guide will walk you through every step of creating a stunning balloon arch backdrop that will become the centerpiece of your event and provide a memorable photo opportunity for your guests. With the right approach and materials, you can create a show-stopping display that rivals professional decoration services while staying within budget.
What You’ll Need
Creating a professional-looking balloon arch requires specific materials and tools that ensure both visual appeal and structural integrity.
Essential Supplies:
- Balloon Decorating Strip: A specialized strip with holes designed for inserting balloon necks. Available in various lengths (typically 10-20 feet) and colors to match your theme.
- Balloons in Various Sizes: A mix of 5-inch, 11-inch, and 18-inch balloons in complementary colors. Having balloons in at least three different sizes adds visual interest and a professional appearance.
- Balloon Pump: A hand pump, electric pump, or helium tank (if using helium-filled balloons), highly recommended to avoid the strain of mouth-blowing.
- Glue Dots: For securing small balloons and filling gaps, creating a fuller, more professional appearance.
- Backdrops or Support Structures: For hanging the completed arch, depending on your installation location.
- Ribbon or Decorative Elements: For adding final touches and customization.
Quality Tip: Invest in high-quality balloons from reputable brands to avoid early deflation. Quality balloons are less likely to pop during assembly and will hold their shape longer during your event.
Step 1: Plan Your Color Palette
Successful balloon arches begin with thoughtful color planning that matches your event theme while creating visual harmony and professional appearance.
Color Selection Strategy:
Choose 3-4 complementary colors that work well together and complement your overall event theme. Avoid using too many different colors, which can create a chaotic appearance. Consider the venue colors, flowers, and other decor elements when selecting your palette.
Use the 60-30-10 rule: 60% of your arch should be your primary color, 30% secondary color, and 10% accent color for the most visually appealing results.
Color Psychology: Consider the mood you want to create. Soft pastels create a romantic, gentle feel, while bold bright colors add energy and excitement. Metallic balloons can add sophistication and glamour to the design.
Size Variation:
Buy balloons in at least three different sizes (5-inch, 11-inch, and 18-inch) for a professional, organic look. The size variation creates depth and visual interest that makes the arch appear fuller and more professionally designed.
For a 10-foot arch, you’ll typically need 50-75 balloons depending on the sizes and how full you make it.
Step 2: Inflate and Assemble
Proper inflation and assembly techniques are crucial for creating a balanced, professional-looking balloon arch that maintains its shape throughout your event.
Inflation Process:
Inflate all your balloons first before beginning assembly. This allows you to see the actual colors and make any adjustments to your plan if needed. Use a consistent inflation size for each balloon type – slightly underinflate for more pliable balloons that are easier to work with.
For the 11-inch balloons, inflate them to about 10 inches for easier handling. For 18-inch balloons, slightly underinflate them to make them more flexible for placement.
Assembly Technique:
Start by inserting the knots of the largest balloons (18-inch) into the holes on the decorating strip, alternating colors and sides to create visual balance. Ensure each balloon is inserted to the proper depth to maintain consistent spacing.
Continue adding balloons, mixing sizes and colors as you work along the strip. Pull each balloon slightly to the side to ensure the next balloon covers the neck of the previous one, creating a continuous, full appearance.
Work in sections of 4-6 balloons at a time to maintain consistent tension and appearance throughout the arch.
Assembly Tip: Work with a partner if possible. One person can hold the strip while the other inserts balloons, making the process faster and more efficient while ensuring proper spacing.
Step 3: Fill in the Gaps
The final step of filling gaps and adding finishing touches is what elevates a basic balloon arch to a professional-quality backdrop.
Gap-Filling Process:
Once all your primary balloons are in place, use glue dots to add the smallest balloons (5-inch) into the empty spaces. These small balloons cover the mechanics of the arch and create a lush, full appearance.
Press the small balloons firmly into the gaps between larger balloons, using the glue dots to secure them in place. This creates the visual effect of a completely solid balloon structure.
Professional Finish: Take a step back regularly as you work to assess the appearance from a distance. Look for any visible gaps or areas that need more coverage, and address these before considering the arch complete.
Color Distribution:
Ensure your colors are distributed evenly throughout the arch rather than clustering in specific sections. A well-designed arch should have a balanced mix of colors from end to end.
Fill any remaining small gaps with additional small balloons or decorative elements to create a completely full appearance.
Step 4: Add Flair & Hang
The final touches and proper hanging techniques complete your balloon arch and ensure it looks its best during your event.
Decorative Elements:
Add faux greenery, silk flowers, or streamers to enhance your balloon arch and create a more elaborate appearance. These elements can be attached with additional balloon strips or secured with floral wire.
Consider adding a custom message, name, or event details to make the arch more personalized and meaningful for your specific celebration.
Hanging Options:
- Wall Mounting: Use tape or hooks to secure the arch to a wall, ideal for photo backdrops
- Backdrop Stand: Use a professional backdrop stand for freestanding arches that can be positioned anywhere
- Ceiling Hanging: Suspend from the ceiling using fishing line or ribbons for a dramatic overhead effect
- Pole System: Create a frame using PVC pipes or similar materials for a custom-sized arch
Safety and Stability:
Ensure your arch is securely fastened and stable before your event begins. Test the installation by gently tugging on various sections to ensure everything is properly secured.
Consider the height of your arch in relation to your guests to ensure it serves as an effective backdrop for photos without being too low to cause safety issues.
Customization Ideas for Different Occasions
Adapting your balloon arch design for specific events helps create a more personalized and meaningful decoration.
Wedding Arch:
Use elegant colors like ivory, blush, and gold with added silk flowers, pearls, or tulle for a romantic, sophisticated appearance. Consider the wedding colors when selecting your balloon palette.
Birthday Theme:
Match the arch to the birthday person’s favorite colors or use traditional birthday colors like pink, blue, and yellow. Add metallic balloons for added glamour and celebration.
Seasonal Variations:
- Spring: Pastel colors with floral accents
- Summer: Bright, energetic colors with tropical elements
- Fall: Warm earth tones with autumn leaves or ornaments
- Winter: Cool colors with snowflake cutouts or silver/gold elements
Theme Consistency: Coordinate your balloon arch with other event decorations for a cohesive appearance. The arch should complement rather than compete with other design elements.
Timing and Assembly Considerations
Proper timing ensures your balloon arch looks fresh and maintains its shape throughout your event.
Assembly Timeline:
For latex balloons, assemble your arch 1-2 hours before your event begins. This ensures the balloons are at their peak appearance while minimizing the effects of gradual deflation during the event.
For events lasting more than 6 hours, consider using some mylar balloons or having replacement balloons available for quick touch-ups.
Weather Considerations:
Balloon arches are sensitive to temperature and weather conditions. Avoid direct sunlight and extreme temperatures, which can cause balloons to expand or contract and potentially pop.
For outdoor events, have a backup plan in case of rain or strong winds that could damage the arch.
Pre-Event Day: Consider inflating balloons the day before and storing them in a climate-controlled area to save time on event day, though this may affect balloon longevity.
Troubleshooting Common Arch Issues
Understanding potential problems and their solutions helps ensure your balloon arch looks perfect throughout your event.
Problem: Balloons Deflating Too Quickly
Solution: Ensure you’re using quality balloons and avoid overinflating them. Consider using Hi-Float treatment for latex balloons, which extends their floating time.
Problem: Arch Appears Too Sparse
Solution: Add more small balloons in the gaps, use larger balloons, or ensure all balloons are properly inserted into the strip to create a fuller appearance.
Problem: Colors Don’t Look as Expected
Solution: Mix lighting conditions can affect how balloon colors appear. Test your color combination in similar lighting to your event venue before finalizing your design.
Problem: Arch Won’t Stay in Shape
Solution: Ensure the arch is properly secured at both ends and that balloons are evenly distributed. For curved arches, consider using a frame or support structure.
Conclusion
Encouraging readers to get creative and customize their arch to perfectly match their party’s theme, this guide provides the foundation for creating stunning balloon arches for any occasion. With proper planning, quality materials, and attention to detail, anyone can create a professional-looking balloon arch that becomes the centerpiece of their celebration.
Remember that the most successful balloon arches are those that reflect the personality and theme of the event they’re designed for. Don’t be afraid to experiment with creative color combinations and decorative elements that make your arch unique.
The combination of strategic planning, proper technique, and creative customization results in a show-stopping backdrop that enhances any celebration and provides memorable photo opportunities for your guests.
With practice and experience, you’ll develop your own style and techniques for creating balloon arches that consistently impress and delight party guests, making this DIY decoration a signature element of your event planning.
The investment in time and materials for a DIY balloon arch pays dividends in the form of a personalized, professional-quality decoration that perfectly matches your event’s aesthetic while staying within budget.